

Hello everyone, and welcome to my tutorial! My name is Ashik, and today I’ll show you how to Create Blurry Transparent Header in Divi. This step-by-step guide will walk you through implementing this design using the Divi theme in WordPress.
Whether you’re a seasoned web designer or just starting out, this tutorial will help you elevate your site with this eye-catching effect. Let’s dive in!
Step 1: Setting Up Your WordPress Site
1.1 Install Divi
If you don’t already have Divi installed:
- Log in to your WordPress dashboard.
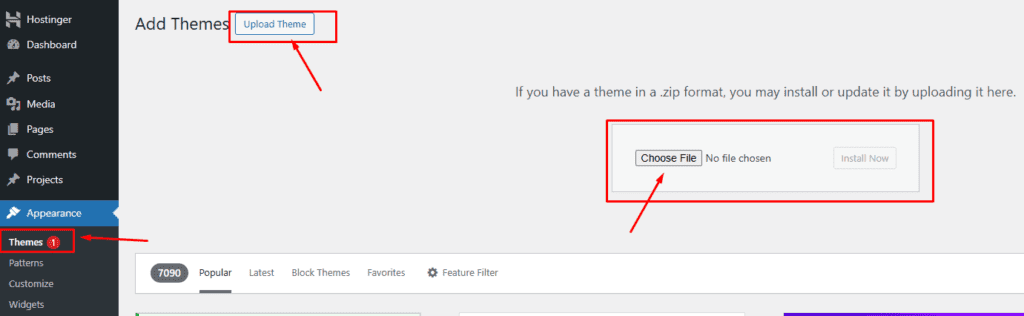
- Go to Appearance > Themes and click Add New.
- Upload and activate Divi.
1.2 Create a Header in Divi Builder
- Navigate to Divi > Theme Builder.
- Add a Global Header and launch the Divi Builder.
- Create a row with your logo on the left and menu items on the right.
Step 2: Adding a Sticky, Transparent Header
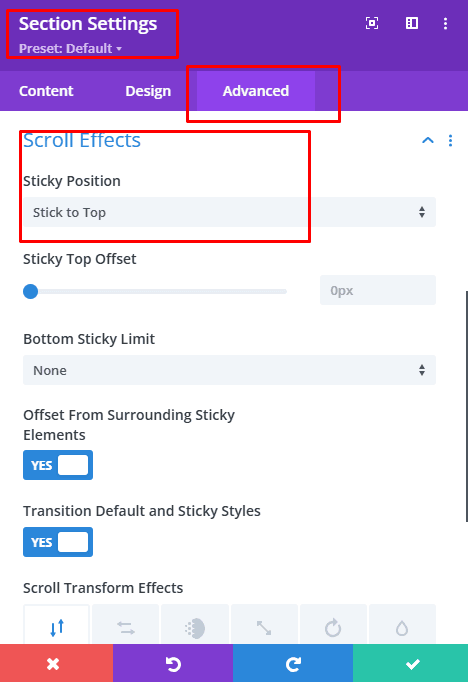
2.1 Enable Sticky Header
- Select the header section.
- In the Advanced tab, go to Scroll Effects and enable Sticky Positioning.
- Set the header to stick to the top when scrolling.
2.2 Make It Transparent
- In the Background settings, reduce the opacity to 0 for the default state.
- Add a slight color overlay to ensure readability.
Step 3: Applying the Blurry Background Effect with CSS
Learn Where to Add Custom Code in Divi
Here’s the magic! To create the blur effect:
- Go to Divi > Theme Options > Custom CSS and paste the following code:
.header-blur {
  backdrop-filter: blur(10px);
  -webkit-backdrop-filter: blur(10px);
  background-color: rgba(255, 255, 255, 0.5);
  transition: all 0.3s ease-in-out;
}

.header-blur.sticky {
  backdrop-filter: blur(20px);
  -webkit-backdrop-filter: blur(20px);
  background-color: rgba(255, 255, 255, 0.7);
}
- Assign the
.header-blurclass to your header. - Adjust the
blur()value for stronger or lighter effects.
Step 4: Making It Responsive
To ensure your header looks great on all devices:
- Use Divi’s Responsive Design Settings to tweak font sizes and spacing.
- Preview your site on a desktop, tablet, and mobile modes.
Step 5: Final Touches
- Add Padding and Margins:
- Go to the Design tab and adjust the padding and margins to align your header content perfectly.
- Test Transparency:
- Check how your blurry header interacts with other site elements, such as scrolling content.
- Preview Your Design:
- Exit the builder and view your site live to ensure the effect works seamlessly.
SEO Tips for Blurry Transparent Header in Divi
- Use descriptive alt text for images in your header to improve search engine visibility.
- Optimize the page’s load speed by compressing background images.
- Include targeted keywords in your header content to enhance on-page SEO.
Conclusion
A blurry header in Divi adds a polished, modern touch to your site while keeping your design on-trend. With just a few steps and some CSS tweaks, you can transform your website into a stunning visual experience.
Start experimenting with different blur intensities and backgrounds to make your Divi website stand out!
That’s all for today!
Discover more by supporting me on


